
5.3. Welcome Screen And Chat#
This page follows the first few minutes of an Agent Master session: opening the welcome screen, entering the main window, loading EDI data, and sending the first request. Later pages go deeper into provider configuration, workflow execution, generated products, and troubleshooting; here the goal is to make the surface feel predictable before any scientific decision is made.
5.3.1. Welcome Screen#
Agent Master opens with a focused welcome screen after the launcher described in installation starts the local server. The four cards are not separate modes; they are a compact map of the normal work rhythm. Load EDI brings survey files into the session, Chat & Plan turns a plain-language request into a workflow, AI Inversion covers model-building and inversion-oriented tasks, and Reports collects the record that makes the result reviewable.
The Start Agent Master button closes the welcome overlay and shows the working interface. If no model provider has been configured yet, this step still works: the app can load data, display the shell of the interface, and show settings. Requests that require planning wait until an LLM provider and API key are available.
5.3.2. The Main Window#
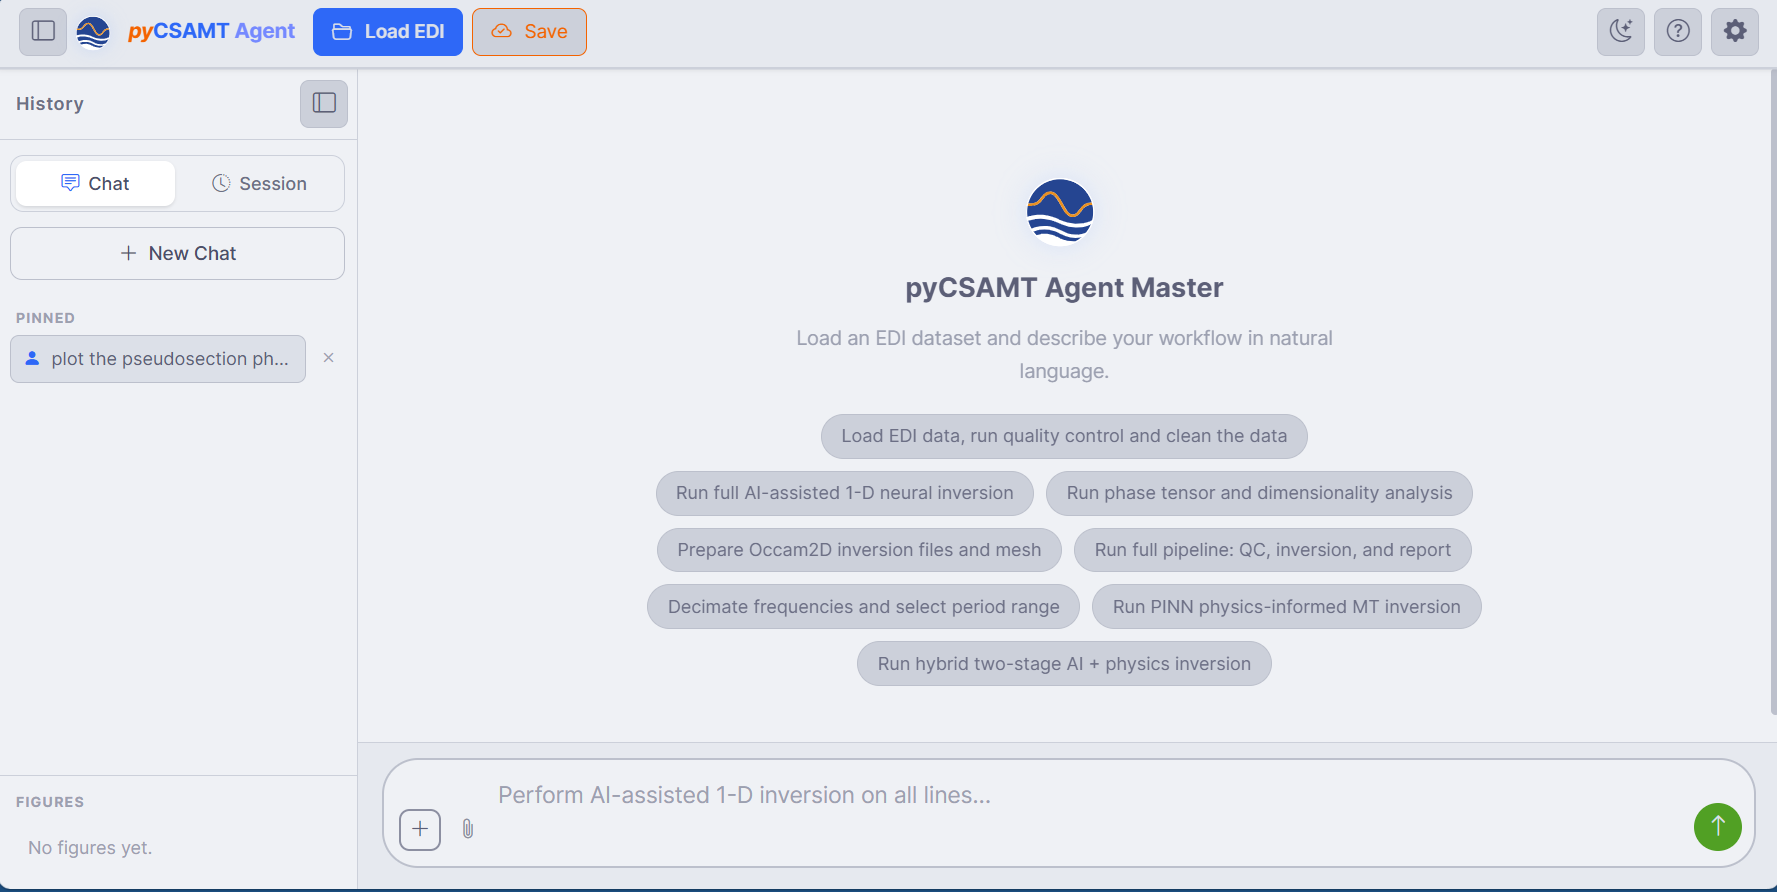
The main window before the first message: command bar on top, History sidebar on the left, the chat area with suggestion chips in the centre, and the natural-language input at the bottom.#
The layout keeps the controls that affect the whole chat session at
the edges and leaves the centre for conversation. Across the top,
the command bar holds Load EDI, Save, the theme toggle,
Help, and Settings. After data is loaded, the same bar shows a compact
survey badge such as 128 EDI / 5 line(s). That badge is intentionally
plain: it tells you how many station files were accepted and how many
profile line groups are available before you ask the assistant to do
anything with them.
The left History sidebar is split into Chat and Session. Chat contains the current conversation, New Chat, and pinned prompts you expect to reuse. Session is for persisted conversations and recent workflow runs. The Figures panel stays visible below those tabs so generated plots can be opened without searching through the full message history.
In the centre, the empty conversation starts with several suggestion chip prompts. They are ordinary requests, just pre-written: quality control and cleaning, AI-assisted 1-D inversion, phase tensor and dimensionality analysis, Occam2D preparation, full pipeline execution, frequency decimation, PINN inversion, and hybrid AI-plus-physics inversion. Clicking a chip sends the same kind of message you could type yourself. The input bar at the bottom is for plain language; the + button and paperclip attach context, and the send button changes to a stop control while a workflow is executing.
While Agent Master works, the pyCSAMT logo beside the reply is the only moving element: its orange signal wave travels and its earth layers drift. Next to it, one line names the current step with “Step n of m” and the elapsed time. Show steps reveals the full step list on hover or keyboard focus. When the reply arrives, the logo stops and stays as that reply’s marker. A stopped or failed reply shows the logo grey with a flat signal. With the operating system’s reduce-motion setting on, the logo stays still and the status text carries the progress.
When Agent Master needs a decision before it can act (for example the sense of a rotation, or which registered line to use instead of an unknown one), the question comes with reply chips. Clicking one sends it as your next message; you can also type any other answer.
5.3.3. Loading EDI Data#
Everything that follows is anchored to the loaded survey. Open the loader with Load EDI on the command bar.
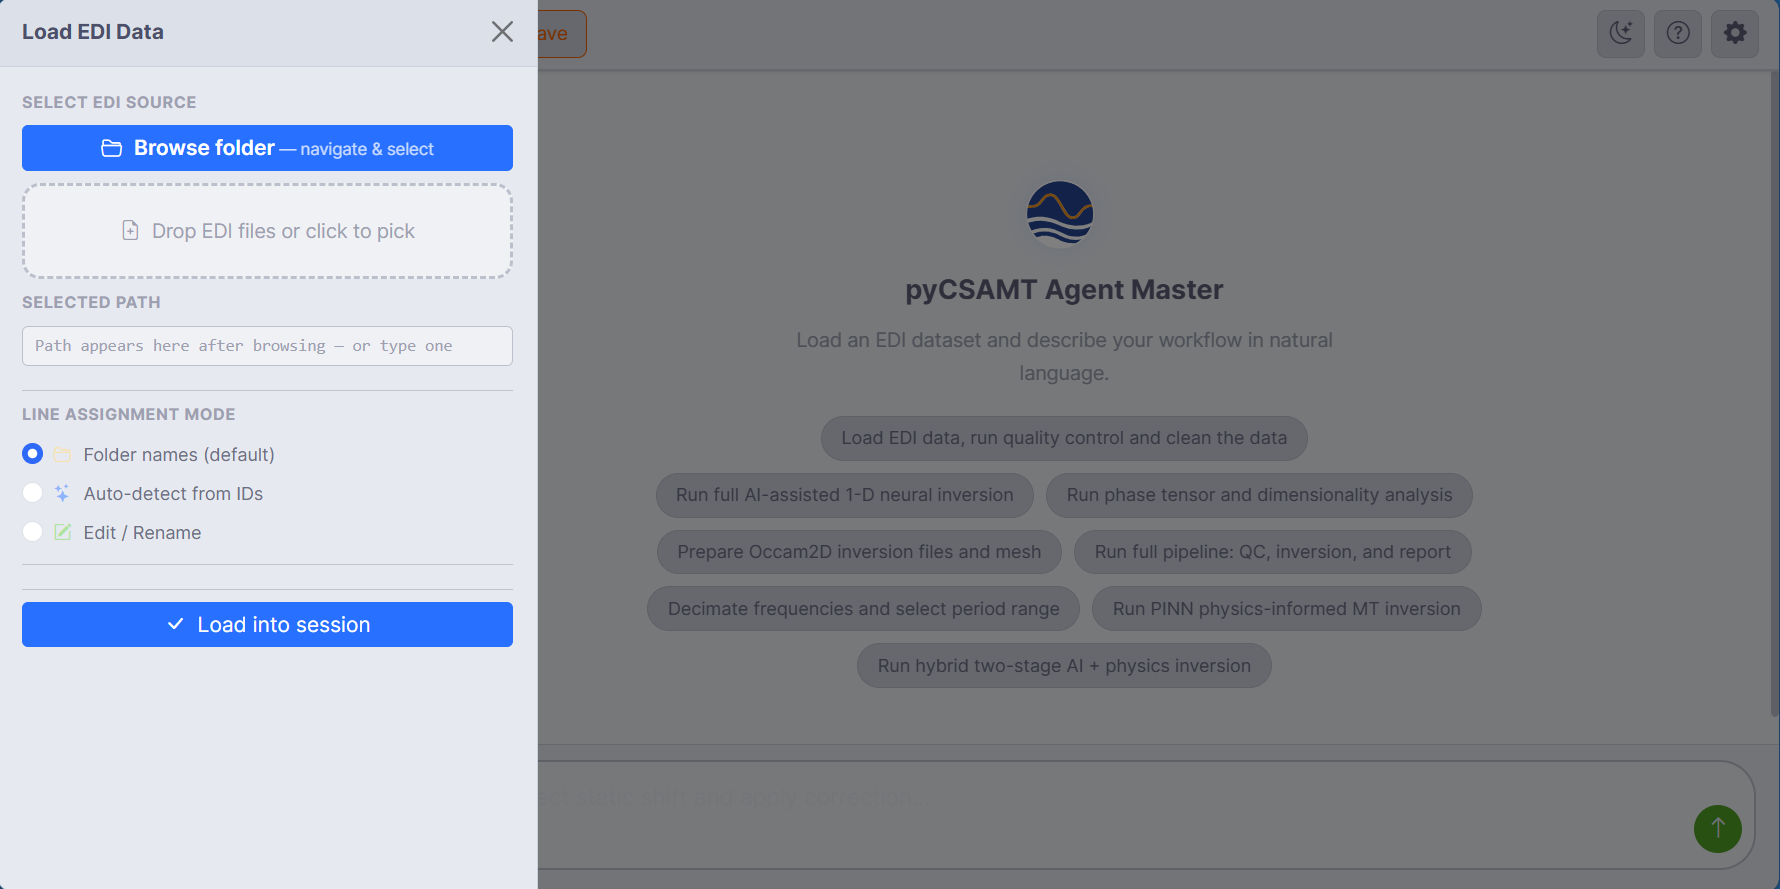
The Load EDI Data drawer: browse to a folder or drop files, then choose how stations are grouped into lines.#
The loader accepts a survey folder, a dropped folder, or dropped EDI files.
Once a source is selected, Line assignment mode defines the mapping from
files to profile lines. With Folder names, each file path belongs to the
line named by its parent folder. With Auto-detect from IDs, the app derives
the line name from the station identifier prefix; for a station id \(s\),
the grouping function can be read as
\(g(s)=\operatorname{prefix}(s)\), where prefix is the leading
letter/number block before the station counter. A numeric prefix is normalized
with an L prefix, so 22-001 and 22_001 both map to L22. With
Edit / Rename, the detected groups are still shown first, but you can
rename them before loading.
This matters for reproducibility because every later line-scoped request uses
the same grouping stored in the session. If a folder contains five lines, the
loader reports them before import, for example L18PLT with 28 EDI files and
L22PLT, L26PLT, L30PLT, and L34PLT with 25 EDI files each.
After Load into session, the command-bar badge summarises the result as
128 EDI / 5 line(s) and the assistant can resolve requests such as
analyse only line L22PLT without guessing which files belong together.
5.3.4. Chatting#
Once the survey is loaded, describe the task in the same terms you would use with a colleague: what can you do?, run QC on every line, prepare Occam2D files for L22PLT, or generate a short report with figures. Agent Master keeps your message on the right and replies on the left, but the important thing is what happens behind the bubble: the request is routed to a pyCSAMT agent or workflow, parameters are checked, and the result is returned with enough context to continue.
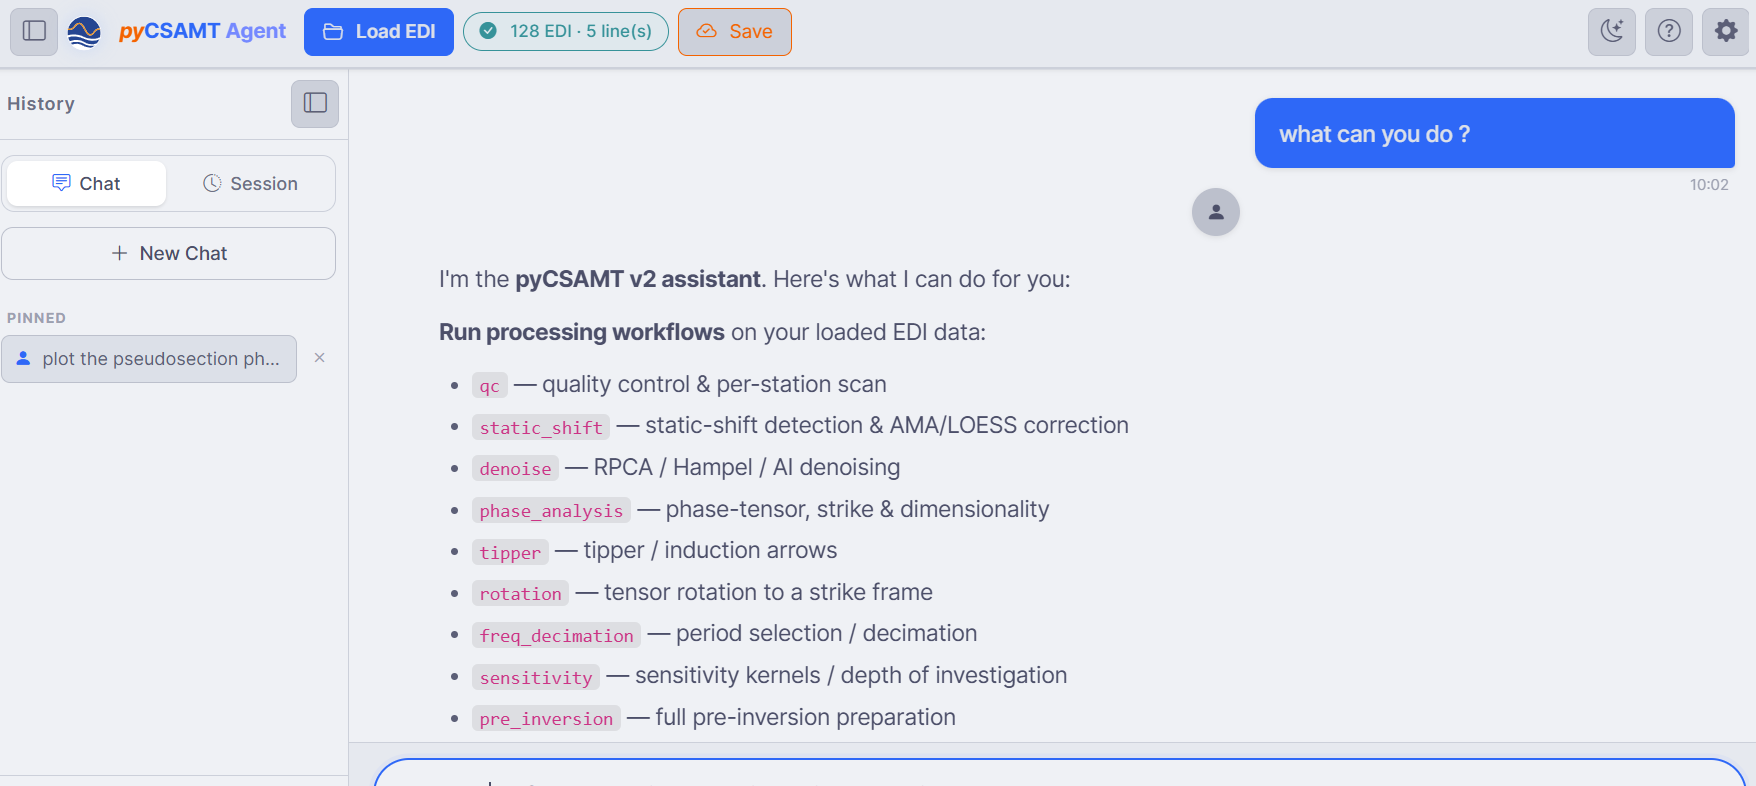
Asking what can you do? lists the workflows Agent Master can run on the
loaded data: qc, static_shift, denoise, phase_analysis,
tipper, rotation, freq_decimation, sensitivity,
pre_inversion, and related tasks.#
The first answer is useful because it exposes the vocabulary the router understands. You do not need to memorize those workflow names, but they help when you want precise control. A broad request such as clean the data and make a report lets the assistant plan several steps, while a narrower request such as run phase tensor dimensionality on L22PLT names both the analysis and the line. If a workflow needs a threshold, period range, export format, or line choice, Agent Master asks inside the chat instead of silently choosing a value.
The figures and messages should be read together. A chat answer tells you what was run and what to inspect next; the figure thumbnail shows the visual evidence produced by that run. For example, a dimensionality response may point you toward skew, ellipticity, and strike consistency before you move to inversion preparation. The screenshot above is still an empty-listing style answer, but the same pattern continues for real workflows: route, run, trace, figures, then the next decision.
5.3.5. Sessions And History#
New Chat starts a fresh conversation, while the loaded survey can remain available to the app. Pinned keeps useful prompts in the sidebar so you can return to the same request after changing lines or parameters. Save writes the current conversation and session state, and the Session tab restores saved runs when you need to continue later.
For a reproducible handoff, keep the saved session with the original survey folder and any exported figures or scripts. The session remembers the conversation and workflow context, but the scientific evidence remains in the survey files and generated products. That separation is what makes it possible to reopen the discussion, rerun a line, or move from Agent Master to the web or desktop application without treating the chat transcript as the data itself.
5.3.6. Next Steps#
Workflows And Agents – what the assistant can run, and how requests become workflows.
LLM Configuration – connect a model provider.